Subscription/Unsubscription system
Contactsend also allows you to automatically create a form that lets users subscribe or unsubscribe from the email group. This means that forms interact directly with the platform's database, so it will no longer be necessary to manually add or remove users - or do it through an Excel file - from your database.
Each subscription/unsubscription/update system is identified by a numeric code (wfc) and is associated with a specific group. Therefore, unsubscription or update links only work if inserted into emails sent from the correct group.
The operation behind Send's subscription and unsubscription forms is based on a numeric field added to the database, called the subscription-field. This field can have three possible values:
- 1 means the user is subscribed.
- -1 means the user has unsubscribed.
- 0 means the user is pending, has received the email to confirm double opt-in subscription but has not confirmed and/or this is the default value assigned by the system if no other value has been specified.
The form is called Subscription. A Subscription allows both subscription and unsubscription management.
If you just want to create an unsubscription link (for example, if subscriptions are managed manually by uploading new users to the database), you still need to create the form following the procedure explained below, and then insert the generated unsubscription link into the message text.
How to create a new subscription/unsubscription/update system
To create a new subscription/unsubscription/update system, choose the desired group from the list on the main page of configure > email groups and click the corresponding subscriptions icon.
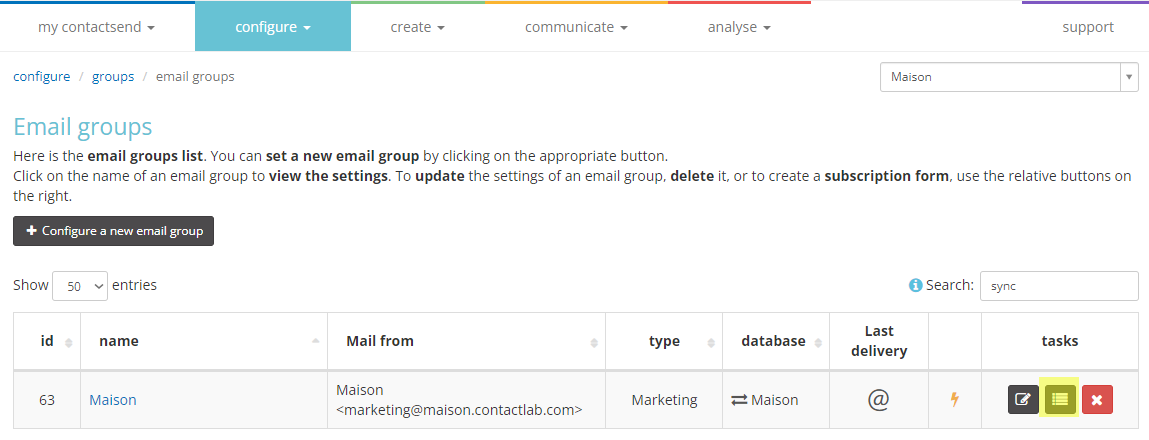
Click Create new form.

In the screen that appears, you will set all the characteristics of the subscription form.
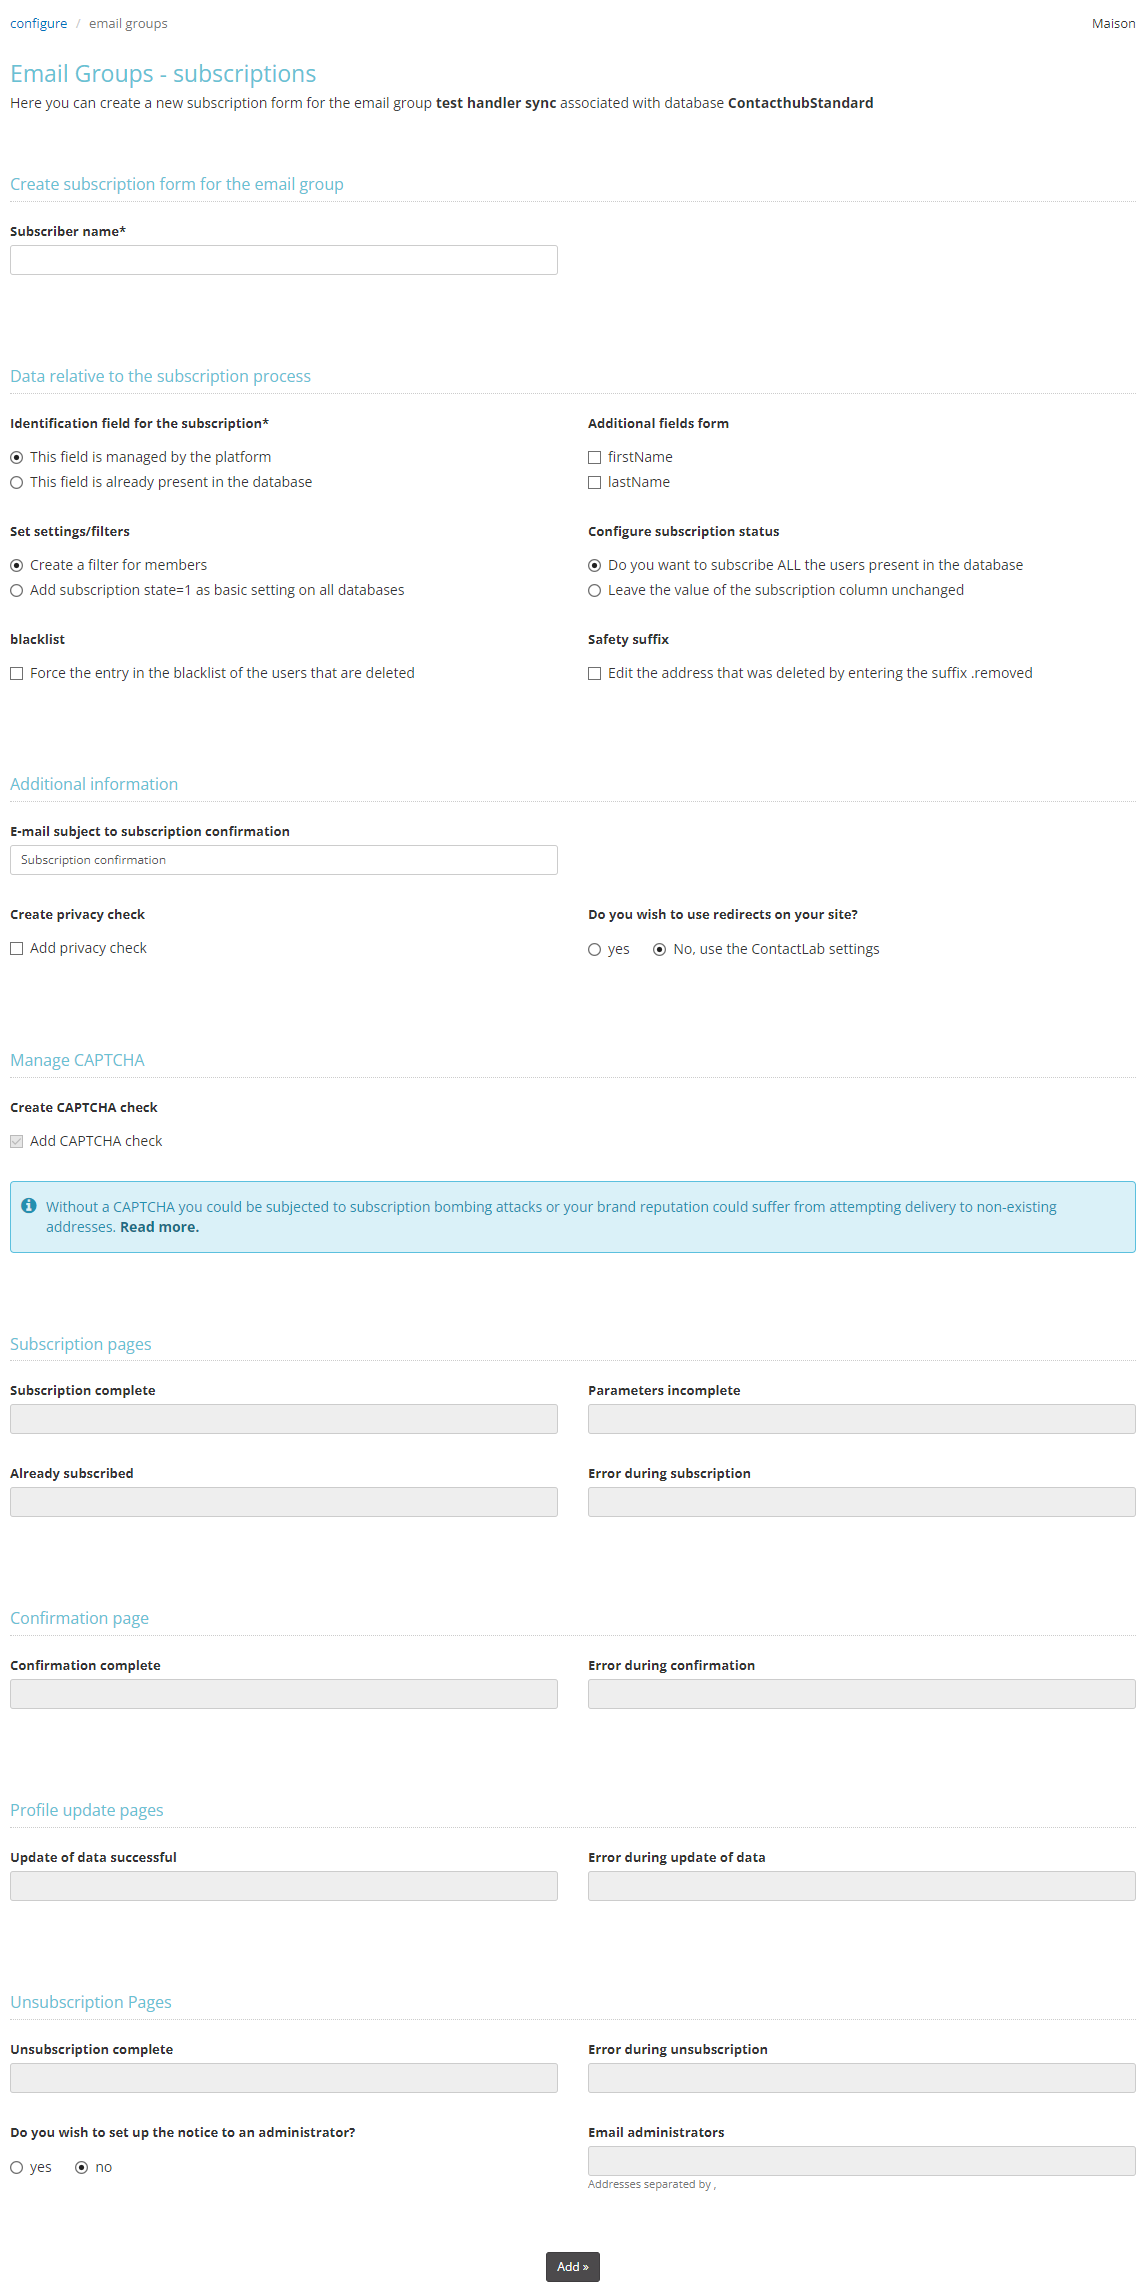
1) Subscriber name: First, enter a name for the form (e.g., Test Subscription).
2) Identification field for the subscription: You need to decide whether the user’s subscription will be managed by the system or if Contactsend can use a field already present in the DB. In the first case, the system will automatically create a new database field, called __cls (__cls1, __cls2, etc.), which will be the “subscription field” used by the form. The subscription field will contain one of these numerical values:
- 1 if the user is subscribed
- -1 if the user is unsubscribed
- 0 if the user is pending subscription confirmation (they received the email to confirm double opt-in subscription but haven't confirmed) and/or this is the default value assigned by the system if no other value is specified.
3) Additional fields form: Choose from the DB fields (those made visible in Configure > User DB > Field Management) which ones to add to the subscription form (besides the email, which is mandatory).
4) Set settings/filters:
- Create a filter for members: Automatically creates a filter within the recipient database (in Configure > User DB) containing users who subscribed via the form.
- Add subscription state=1 as basic setting on all database: You can set a condition on the entire database so that the subscription field equals 1 (i.e., subscribed user): in this case, all users with a value of 0 or -1 will not be displayed in the database and will be automatically excluded from mailings (without the need to set a specific filter).
5) Configure subscription status:
- Do you want to subscribe ALL the users present in the database: Sets the __cls field to 1 for all records.
- Leave the value of the subscription column unchanged: If the field is managed by the system (__cls), the system will default to a value of 0. If the field already exists, the current value will remain unchanged.
6) Blacklist: If the box is checked, when the user unsubscribes, they will be forcibly added to the blacklist (a security measure to avoid resending to an unsubscribed user).
7) Safety suffix: If the box is checked, when unsubscribing, the user's email address will be appended with the security suffix .removed (a security measure to avoid resending to an unsubscribed user).
The created subscription will be double opt-in: after filling out the form, the user will receive a confirmation email, and to confirm, they must click on a link. This option ensures that the email address the user subscribes with is real and active.
8) Add privacy check: Allows the insertion of a privacy notice in the form that the user must accept to subscribe.
9) CAPTCHA control: Invisible CAPTCHA is automatically added to subscriptions created from May 2022. For subscriptions already active at that time:
- Using standard forms that already use a CAPTCHA?
The invisible CAPTCHA is automatically activated on both active forms and new ones you create. - Using standard forms that don’t use a CAPTCHA but want to add it?
Access the subscription form and insert the CAPTCHA. You’ll benefit from the invisible CAPTCHA right away. - Customized the form and use CAPTCHA?
Update the form with a new snippet retrievable in Send to introduce the invisible CAPTCHA. - Customized the form but don’t use CAPTCHA and want to add it?
Request support from one of our experts for invisible CAPTCHA configuration.
10) Pages for subscription/confirmation/update/unsubscription: A subscription form requires a series of redirect pages: confirmation page that the subscription was successful, or error page, etc. As a redirect, you can use Contactsend-generated pages, or pages from your website. You can also notify one or more email addresses of individual user subscriptions/unsubscriptions/updates.
At this point, click the add button to create the form.
How to manage the subscription/unsubscription system
The new subscription/unsubscription/update system will be listed on a page (from configure > email groups, click the subscriptions icon). Click the manage button.

Clicking manage opens the system management page. The page is divided into five tabs:
-
Details: Summarizes the system’s settings.
-
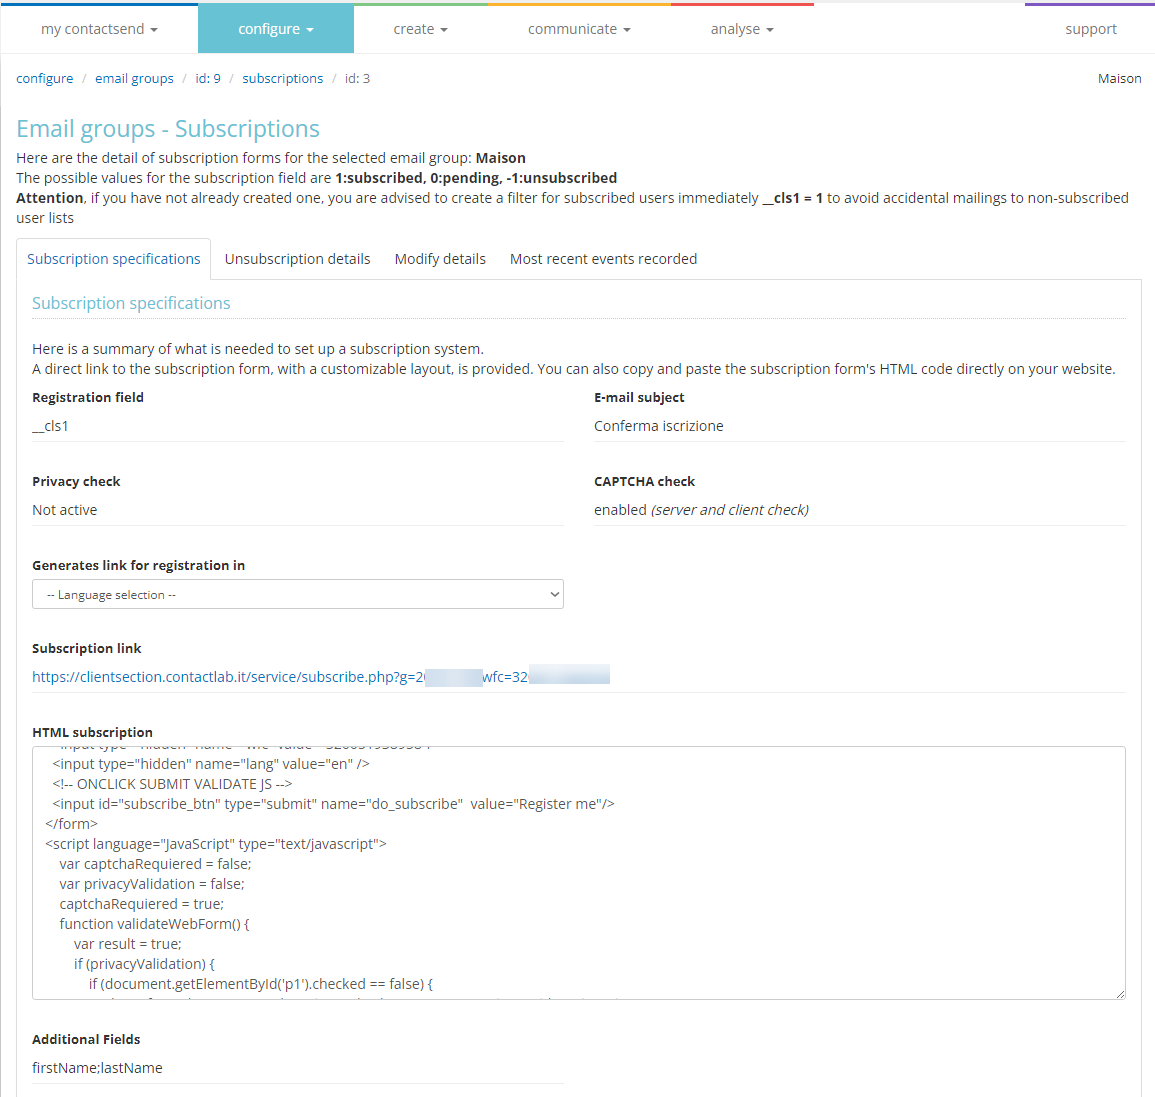
Subscription specifications: Contains everything needed to put the form online; you can copy the Subscription Link that points to a page on Contactlab.it (the page layout is standard but customizable upon request by Contactlab experts), or copy the HTML code from the “Subscription HTML” box to place it on your website. The subscription link is generated in Italian. To generate the link in another language, select the desired language from the dropdown menu.
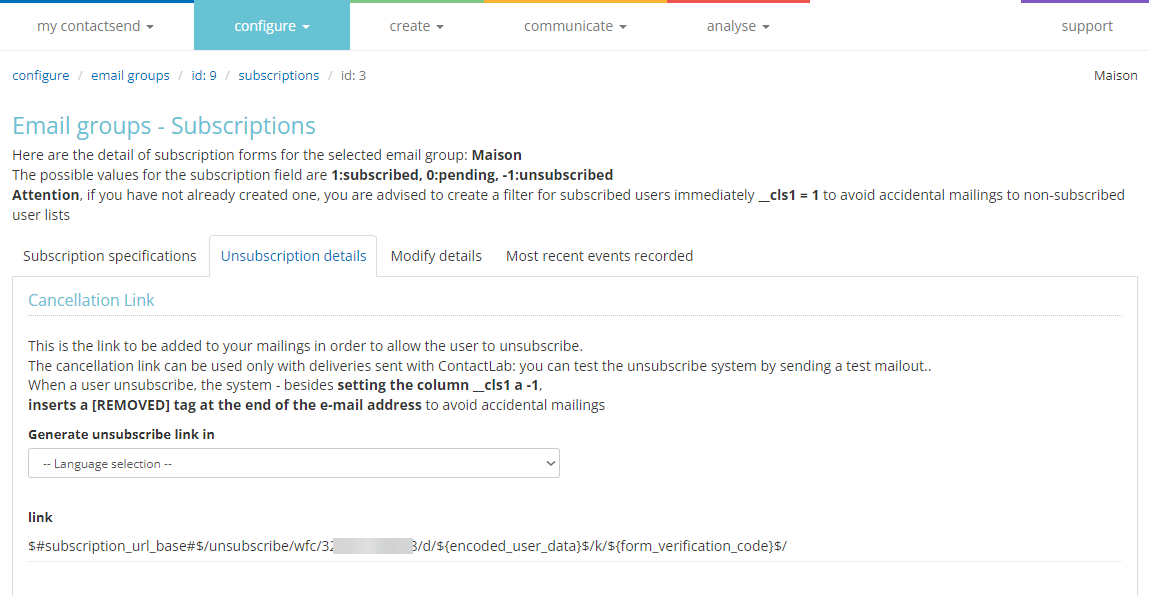
- Unsubscription specifications: Contains the link to insert in the message that allows the user, if desired, to unsubscribe from the group. The unsubscription link is dynamic, meaning once clicked by each user, it leads to a form allowing them to unsubscribe from the group. The unsubscription link is generated in Italian. To generate the link in another language, select the desired language from the dropdown menu.
Each link works only for the mailings of the group to which it is associated!
- Modify details: Here you’ll find the update link. Inserting this link into an email from the group associated with the subscription/unsubscription system, the user will be redirected to a form containing all the visible fields (Configure > User DB > Field Management) of their record in the database. The fields will be pre-filled with the values currently present: the user can modify the values and fill in the empty fields, and when confirmed, the new values will immediately populate the Contactsend DB. The profile update link is generated in Italian. To generate the link in another language, select the desired language from the dropdown menu.
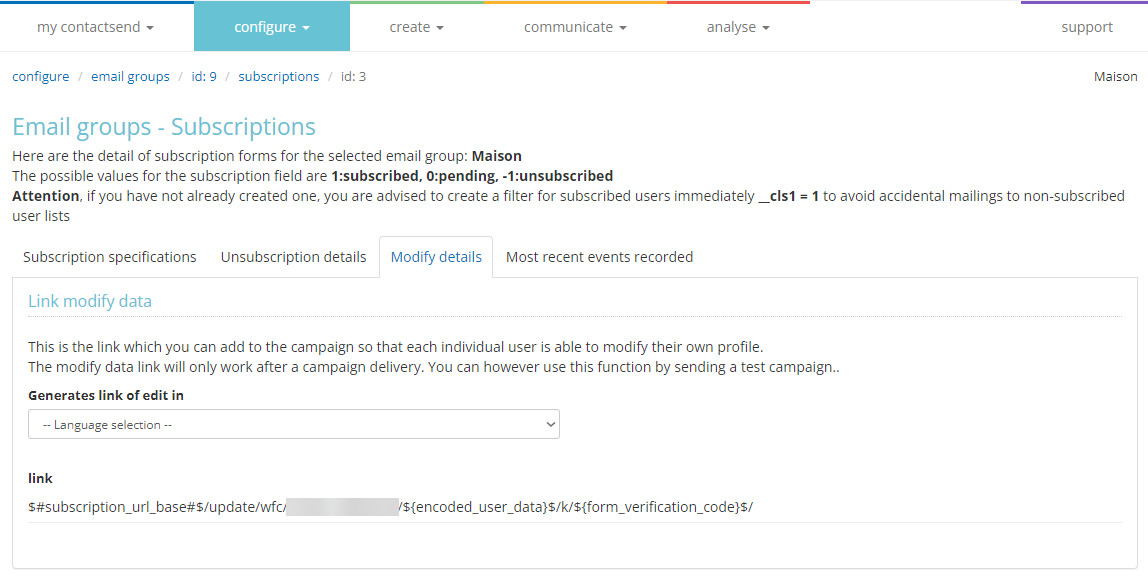
- Most recent events recorded: Lists the most recent subscriptions, confirmations, and unsubscriptions.
Once an automatic subscription/unsubscription/update system is in place, it is advisable not to overwrite the database when uploading new users, but rather add them to the records already present (Configure > User DB > Operations from file). This is to avoid losing information on potential unsubscriptions (-1) contained in the subscription field.
The languages currently available are:
- it = Italian
- en = English
- fr = French
- es = Spanish
- de = German
- ar = Arabic
- bg = Bulgarian
- zhs = Simplified Chinese
- zht = Traditional Chinese
- kr = Korean
- dk = Danish
- et = Estonian
- fi = Finnish
- jp = Japanese
- gr = Greek
- lv = Latvian
- lt = Lithuanian
- no = Norwegian
- nl = Dutch
- pl = Polish
- pt = Portuguese
- ro = Romanian
- ru = Russian
- sk = Slovak
- sl = Slovenian
- se = Swedish
- th = Thai
- tr = Turkish
- hr = Hungarian
Database management consequences
Each Subscription is associated with a group but operates on the database associated with that group. There are some differences in managing a database where a Subscription is active:
- You cannot change the database associated with the group where the Subscription is active. You must first delete the Subscription, change the connected database, and then create a new Subscription. It is generally recommended NOT to change the database connected to a group with an active Subscription.
- If you need to manually add users to the database via Excel or CSV file, remember to NOT overwrite the users, as this would result in losing all information contained in the "subscription field" (users who have unsubscribed). Instead, select the "Add to existing records" option to add new addresses without losing the existing information in the database.
- When inserting new users via File Operations, make sure to add the subscription field (e.g., __cls1) set to 1 for all users you want to import.
If the subscription field is not set for each user during file operations, the system will default to zero. This means that if there is a base filter on the DB, the added users will not be visible.